[DevOps] Nginx Lua module 사용법
안녕하세요? 정리하는 개발자 워니즈입니다. 이번시간에는 nginx lua module에 대해서 정리를 해보도록 하겠습니다. lua script는 이전에 nginx 관련 세미나를 들으면서 알게 됐던 내용인데요. nginx의 config에 마치 개발 코드를 작성하듯 script를 넣어서 제어할 수 있는 부분이 꽤나 인상적이였습니다.
필자의 회사에서도 nginx의 lua script를 통해서 제어가 필요한 요청을 받았습니다. 이를 해결하고자 lua module 탑재를 진행하게 됐습니다.
Nginx에 관한 시리즈 포스팅은 아래에서 확인이 가능합니다.
- [DevOps] Nginx 컴파일 설치
- [DevOps] ansible nginx config 배포 구성
- [DevOps] Nginx Logrotation 설정
- [DevOps] Nginx GeoIP 모듈 적용
- [DevOps] Nginx Log Aggregation & Dashboard
- [DevOps] Nginx Rate Limit
- [DevOps] Nginx Lua module 사용법
1. Nginx Lua module 이란?
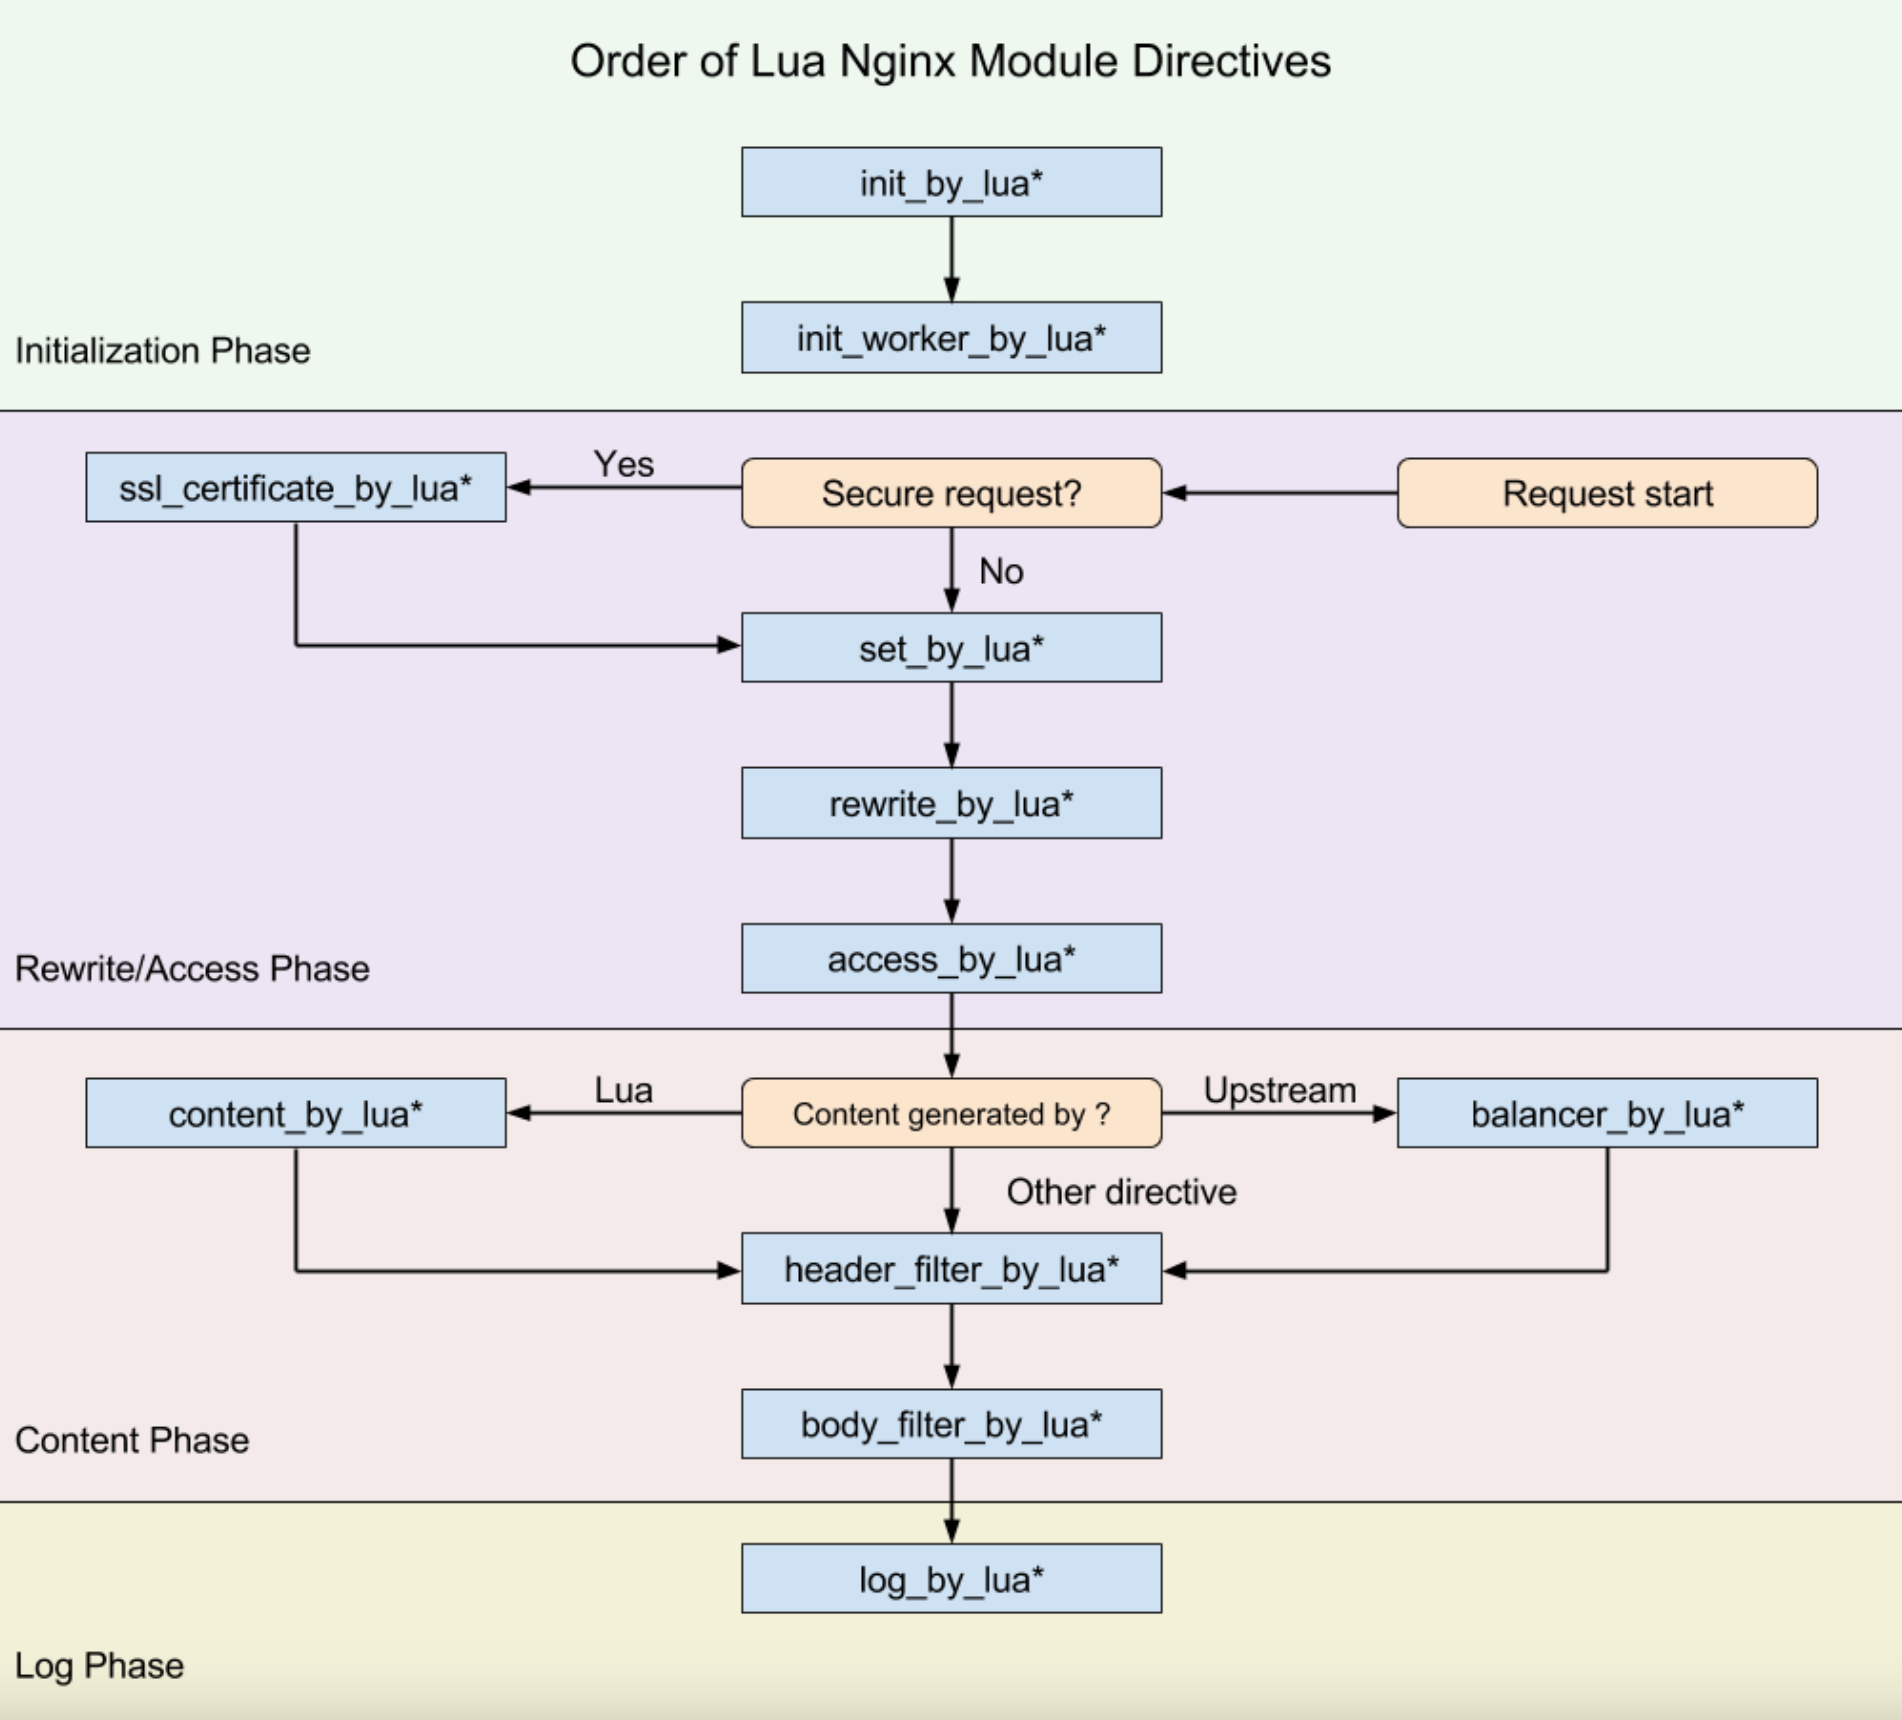
lua-nginx-module은 Nginx에 Lua 스크립팅 기능을 추가하는 모듈입니다. 이를 통해 Nginx의 요청 처리 흐름에 Lua 코드를 삽입하여 다양한 작업을 수행할 수 있습니다. OpenResty 프로젝트의 일부로, 고성능 웹 애플리케이션을 구축하는 데 유용합니다.
주요 기능
- 동적 컨텐츠 생성: Lua 스크립트를 사용하여 요청에 대한 동적 응답을 생성할 수 있습니다.
- 고급 접근 제어 : 요청 헤더, 쿠키, IP 주소 등을 기반으로 접근 제어 로직을 구현할 수 있습니다.
- 응답 필터링 및 수정 : 응답 본문을 필터링 하거나 수정할 수 있습니다.
- 복잡한 인증 및 인가 : 외부 인증 서버와 통신하여 복잡한 인증 및 인가 로직을 구현할 수 있습니다.
- 로깅 및 모니터링 : 맞춤 로깅 메커니즘을 구현하고, 실시간 트래픽 모니터링 데이터를 수집할 수 있습니다.
공식 github은 아래에서 확인이 가능합니다.
2. Nginx Lua module 설치
필자는 nginx를 직접 compile 해서 사용하고 있습니다. container 기반에 이미 만들어진 이미지를 활용하는것이 훨씬 효율적일 수 있습니다. 필자는 custom module을 추가함에 있어 자유도가 있기 때문에 native로 운영중에 있습니다.
그럼 본격적으로 각 스텝별로 설치 가이드를 작성해보겠습니다.
- LuaJIT 설치
lua-nginx-module을 사용하기 위해선, LuaJIT 또는 Lua 5.1 이상이 필요합니다. LuaJIT를 사용하는 것이 일반적으로 권장되며, 성능상의 이점이 있습니다.
# LuaJIT-2.0.5 설치
wget http://luajit.org/download/LuaJIT-2.0.5.tar.gz
wget https://line-objects-internal.com/fileshare/logs/LuaJIT-2.0.5.tar.gz

# 압축 해제 및 설치
tar -xvzf LuaJIT-2.0.5.tar.gz
cd LuaJIT-2.0.5
make
make install

# LuaJIT 설치 후, LuaJIT 라이브러리 경로를 시스템 라이브러리 경로에 추가
export LD_LIBRARY_PATH=/usr/local/lib:$LD_LIBRARY_PATH
luajit -v
- Nginx와
ngx_devel_kit(NDK)
# NDK 설치
wget https://github.com/simplresty/ngx_devel_kit/archive/v0.3.1.tar.gz
tar -zxvf v0.3.1.tar.gz
lua-resty-core와lua-resty-lrucache를 설치
# lua-resty-core 설치
git clone https://github.com/openresty/lua-resty-core.git
cd lua-resty-core
make install

# lua-resty-lrucache 설치
git clone https://github.com/openresty/lua-resty-lrucache.git
cd lua-resty-lrucache
make install
lua-nginx-module설치
# lua module 다운로드
git clone https://github.com/openresty/lua-nginx-module.git
위의 작업들은 사전에 필요한 라이브러리 및 모듈을 다운로드, 설치 하는 과정에 대해서 설명했습니다.
이제 본격적으로 Nginx를 re-compile을 수행하여 module을 탑재합니다.
- Nginx Compile
export LUAJIT_LIB=/usr/local/lib
export LUAJIT_INC=/usr/local/include/luajit-2.0

# Version Info
NGINX_VERSION=1.20.1
PCRE_VERSION=8.44
OPENSSL_VERSION=1.1.1l
ZLIB_VERSION=1.2.11
NGINX_PATH=/home1/irteam/apps/nginx-${NGINX_VERSION}


# Nginx Compile
./configure --prefix=${NGINX_PATH} \
    --user=irteamsu --group=irteamsu \
    --with-http_ssl_module \
    --with-http_stub_status_module \
    --with-http_realip_module \
    --with-http_v2_module \
    --add-dynamic-module=/pkgs/ngx_http_geoip2_module \
    --with-ld-opt="-Wl,-rpath,/usr/local/lib -lpcre" \
    --add-dynamic-module=/pkgs/lua-nginx-module \
    --add-dynamic-module=/pkgs/ngx_devel_kit-0.3.1 \
    --with-pcre=/pkgs/pcre-${PCRE_VERSION} \
    --with-openssl=/pkgs/openssl-${OPENSSL_VERSION} \
    --with-zlib=/pkgs/zlib-${ZLIB_VERSION}

# Nginx Install
make -j2
make install
3. Nginx Config 수정
위의 과정을 통해서 nginx binary에 lua module을 탑재했습니다. lua module을 사용할 수 있도록 import 합니다.
# add necessary `lua_package_path` directive to `nginx.conf`, in the http context
load_module modules/ndk_http_module.so;
load_module modules/ngx_http_lua_module.so;

events {
    worker_connections  3000;
}

http {
    lua_package_path "/usr/local/lib/lua/?.lua;;";
    ....
}
적용을 하면서 여러가지 이슈 사항들을 겪었습니다. 그 내용에 대해서 정리를 해보겠습니다.
설치시 발생한 이슈
- 설치시 환경 변수 셋팅
# 오류 내용
adding module in /usr/local/src/ngx_devel_kit-0.3.1
+ ngx_devel_kit was configured
adding module in /usr/local/src/lua-nginx-module-0.10.19
checking for LuaJIT 2.x ... not found
   ./configure: error: unsupported LuaJIT version; ngx_http_lua_module requires LuaJIT 2.x.
nginx를 컴파일하고 설치를 했더니 위와 같은 오류가 발생했습니다. LuaJIT이 필요하다는 내용인데요. 분명히 LuaJIT을 설치했지만 찾을 수 없는 것 같았습니다.
- Resolve Ref : https://forum.openresty.us/d/6494-ngx-http-lua-module-requires-luajit-2x
# nginx compile 시에 환경 변수 설정.
export LUAJIT_LIB=/usr/local/lib
export LUAJIT_INC=/usr/local/include/luajit-2.0
- PCRE 옵션 설정
# 오류 내용 /tmp/nginx.lJpu0R.ltrans10.ltrans.o::function ngx_http_lua_log_by_chunk: error: undefined reference to 'pcre_malloc' /tmp/nginx.lJpu0R.ltrans10.ltrans.o: :function ngx_http_lua_log_by_chunk: error: undefined reference to 'pcre_free' /tmp/nginx.lJpu0R.ltrans10.ltrans.o: :function ngx_http_lua_log_by_chunk: error: undefined reference to 'pcre_malloc' /tmp/nginx.lJpu0R.ltrans10.ltrans.o: :function ngx_http_lua_log_by_chunk: error: undefined reference to 'pcre_free' /tmp/nginx.lJpu0R.ltrans10.ltrans.o: :function ngx_http_lua_body_filter_by_chunk: error: undefined reference to 'pcre_malloc' /tmp/nginx.lJpu0R.ltrans10.ltrans.o: :function ngx_http_lua_body_filter_by_chunk: error: undefined reference to 'pcre_free' pcre와 관련된 내용의 오류가 발생했습니다. Nginx Compile 과정에서 pcre를 적절하게 시스템에서 사용할 수 있도록 link를 해야된다는 것을 알았습니다. 다음의 옵션값으로 설치를 진행합니다.
- Resolve Ref : https://github.com/openresty/lua-nginx-module/issues/1984
# pcre 링크 설정
--with-ld-opt="-Wl,-rpath,/usr/local/lib -lpcre"
-Wl,-rpath,/usr/local/lib: 실행 시간(runtime) 라이브러리 검색 경로를/usr/local/lib으로 설정합니다. 이는 동적 라이브러리(.so 파일)를 로드할 때 사용됩니다.-lpcre: PCRE(Perl Compatible Regular Expressions) 라이브러리를 링크합니다. 이는 Nginx의 정규 표현식 처리 기능을 위해 필요합니다.- Package Path 설정
# 오류 내용
nginx: [error] lua_load_resty_core failed to load the resty.core module
nginx에서 module을 로딩할 수 없다는 내용입니다. config 설정에서 모듈을 불러 올 수 있도록 설정합니다.
- Resolve Ref : https://github.com/openresty/lua-nginx-module/issues/1533
# module 로딩
http {
   lua_package_path "/usr/local/lib/lua/?.lua;;";
}
3. Nginx Lua script 예제
처음에 lua module을 탑재하게 된 계기는 403 status code를 200으로 전환이 가능한지에서부터 시작했습니다. 개발팀의 특정 상황으로 인해서 어쩔 수 없이 403 code를 반환하는 상황이 있었습니다. 이를 200으로 전환하여 google로 하여금 seo indexing이 되도록 설정하고자 해습니다.
기본적인 Nginx에서는 status code를 변조하는것을 허락하지 않습니다. 이를 lua script를 통해서 변경했고 다음과 같이 config 설정을 작성했습니다.
location / {
    resolver xxx.xxx.xxx.xxx valid=600s;
    proxy_pass https://$backend;
    proxy_next_upstream error timeout;
    proxy_redirect off;
    proxy_connect_timeout 2s;

    # response header를 변조합니다.
    header_filter_by_lua_block {
        # .json 확장자에 대해서는 예외처리
        if ngx.var.uri:match("%.json$") then
            return
        end

        local content_type = ngx.header["Content-Type"]
        if content_type and content_type:match("text/html") then
            if ngx.status == 403 then
                # status code를 200으로 반환
                ngx.status = 200
            end
        end
    }
...
}
위의 내용을 통해서 적절하게 status code를 변경할 수 있었습니다. 이 외에도 다양한 활용 사례들이 있습니다. 이는 다음번 포스팅에서 작성을 해보도록 하겠습니다.
4. 마치며…
Nginx는 정말 웹서버 이상으로 강력한 활용 사례가 있다고 생각합니다. 이번에는 lua module을 통해서 header 제어에 대해서 확인을 했지만, 다음번에는 다양한 활용 사례에 대해서도 포스팅을 해보겠습니다.
또한, Nginx에는 유용한 모듈들이 많기 때문에 이러한 부분들에 대해서도 확인하고 학습하면 좋을 것 같다는 생각을 해봤습니다. 이상으로 포스팅을 마칩니다. 감사합니다.
5. 참고
https://www.jacobbaek.com/1369
https://byeong-gook.tistory.com/64
https://blog.naver.com/n_cloudplatform/222182688666